| START HERE |
|
| Register | FAQ | PM | Events | Groups | Blogs | Calendar | Mark Forums Read |
|
|
|
Unregistered
|
||||||


| DJI Heli Autopilot System(Naza-H/WooKong-H/Ace One) DJI Heli Autopilot System(Naza-H/WooKong-H/Ace One) Factory Support Forum |
|
|
 |
|
|
LinkBack | Thread Tools | Display Modes |
 12-12-2012, 07:55 AM
|
#1 (permalink) | ||||
|
Registered Users
Join Date: Jul 2007
Location: Melb, Oz
|
Hi all,
I was recently asked if I wanted to test and review the new DJI NAZA-H with GPS by Quinton from MultiWiiCopter and as I enjoy playing with FBL controllers and want to start working with GPS enabled systems I jumped at the chance. Knowing DJI's reputation as a leader in the field with mutlicopters and also high-end automated flight systems I looked forward to seeing how their latest hobby level heli unit would fair. The unit is a full 3d capable FBL controller that has an additional attitude (ATTI) mode to provide added stability similar to the Self Level modes on some of the other FBL controllers like the Brain and Skookum. Where this unit differs is that it has a GPS option that can add additional precision to the ATTI mode and provide position hold and more accuracy in the flight when in ATTI mode. The units have only been available for a couple of weeks and I received the full package with NAZA-M, optional GPS and also a High Voltage 5-15A BEC unit that is being included as a promotion for early purchases. You can find the specifications of the unit, some photos and details around the promotion on the following link. http://www.multiwiicopter.com/products/naza-h-heli-gps The plan is to fit and test the unit on my basher MSH Protos Stretch heli and then move it over to the Goblin 700 for further testing when I am comfortable with the unit. I have not decided if I will try the included BEC on my Protos as I already have a WR 10A BEC that has taken over from the in built BEC in the 100A Castle ICE Lite ESC, but I won't be using the BEC on my Goblin. The setup on the Goblin is running direct 2S LiPo which I am happy with and I notice that the NAZA BEC only has a single output to go into the controller. On my 600+ heli's I like to run 2 servo leads carrying power to the FBL unit as a single standard servo plug is not really up to the task for these high load setups. Anyway I will cover the BEC further if I mount it in the Protos for the testing. The first hurdle I encountered was the NAZA does not support using DSM type satellites for the Rx signal so if running JR/Spektrum you will need to use an RX with at least 7 Channels. For Futaba users S-BUS is supported so this reduces the wiring substantially. Unfortunately I only had some 6 Channel Receivers so I grabbed a new DSMX 7010 Rx for the job. After unpacking all of the components, leads, mounts, sticky pads, etc from the NAZA-H package I setup a new model in my DX8 and bound the Rx. While in the TX setup I disabled the trims by setting the trim steps to 0 which I find is good practice with all of my FBL models. The quick guide instructions on the DJI site recommend mounting all of the equipment on the heli first the going through the setup routine, I decided to break from that a little as I wanted to do some basic checks first before I mounted the units. So following the instructions I plugged the Rx and IMU (main unit) together with 7 of the 8 included male-male leads. The plug order for Futaba/Hitec and JR/Spektrum receivers is show. The patch leads themselves have the futaba tags on them that need to be removed if plugging into a JR/Spektrum Rx and they are fairly short in length which may cause some difficulty in mounting, but as the leads are generic you should be able to source longer ones easily if required. The quick guide and the software can be found on DJI's site here. I connected the GPS and Remote LED which also has the Micro USB plug in it to connect to a PC. After downloading the driver and software linked above I powered the NAZA with it plugged into the USB port as directed, ran the driver install followed by the PC software install. On my Windows 7 Laptop the process went very smoothly, no replacing driver files or other twists needed, just follow the prompts. Next up I started the software and was presented with a login prompt asking for my Email and a password. This isn't mentioned in the quick-start setup but just today I found some Video's from DJI on Youtube and they showed the process of registering on the DJI site as part of the setup process. I decided to go ahead and register, and didn't try to see if the software will let you use it without registering but after doing the registration and confirming via a link sent in email I was able to login to the software on my PC. I ticked the remember me box and haven't seen the login prompt since. At this point I could see that I had connection with the voltage being displayed live in the software and the next step was to check if there has been any updates to the firmware or software before continuing. I did get a bit of a strange message as the Software correctly recognised that it was version 1.00 and there was no update available, the Firmware said it was version 1.00 and and update to version 1.00 was available to download, so somewhere something was out of step. I decided to do the update, partly as a test of the process but also in case there was a fix and they didn't up the version number correctly. The update process worked fine and asked me to disconnect and reconnect the power to the unit. When it came back up it again asked if I wanted to update, so my guess is the software has a small bug in it. The next step is to setup the servos etc so I decided it was time to mount everything up so I can complete the setup fully in the heli, but that will have to wait till Friday. Here is a quick picture of the unit plugged together before I take it apart to mount everything. 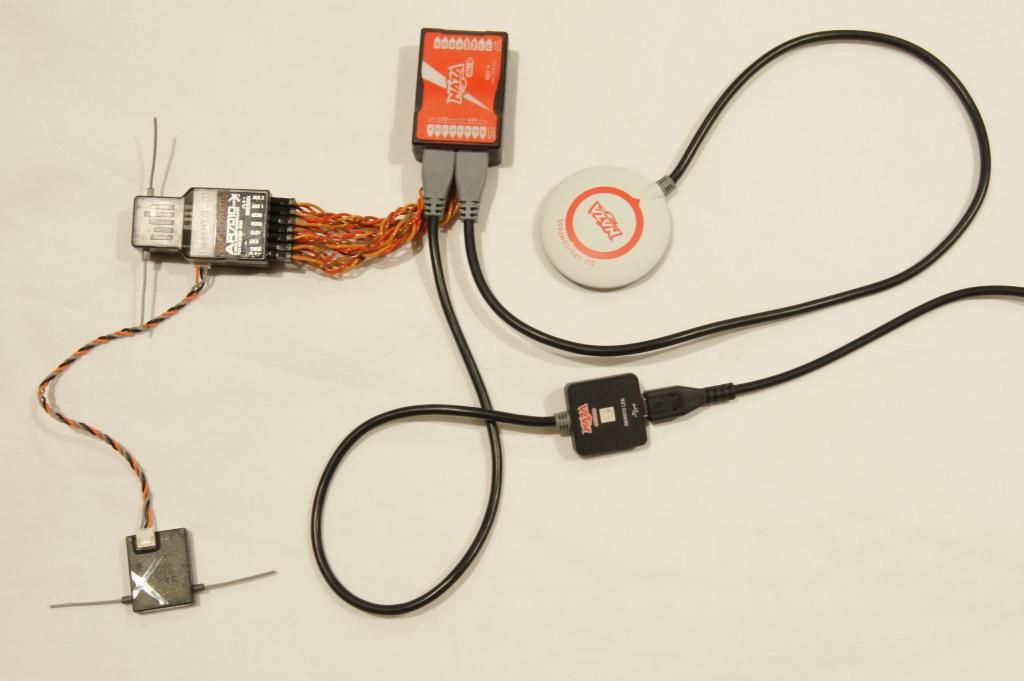 The setup videos from DJI can be found here.
p.s. Interesting that the video says to install the software first, then the driver which is the opposite way the quick start guide says to do it. Well I followed the quick start guide and did the driver first and it worked for me. //Dennis
__________________
soXos: Strike 8.1 - Strike 7.1 Light - Strike 6.1 : Goosky: RS7 - RS4 - S2 - S1 soXos DB7 nightflyer : Jeti DS-16 & DS-12 I am www.soxosaustralia.com.au | soXos helis | 1st-RC Products | EGODRIFT motors | Goosky helis | Spinblades |
||||

|


|
| Sponsored Links | |||
|
Advertisement |
|
||
|
12-12-2012, 07:56 AM
|
#2 (permalink) | |
|
Registered Users
Thread Starter

Join Date: Jul 2007
Location: Melb, Oz
|
A new version of the firmware and the quick start documentation was released yesterday so before installing the unit on the heli I updated the firmware. When I plugged the unit in to the PC it automatically popped up a box letting me know of the update and its changes. The update covers the following:
Quote:
I then spent the next hour or so mounting the units on the heli. The NAZA comes with double sided mounting pads cut to size. The pads are made of white 3M VHB but it is a thiner version than the clear 4010 3M with the red backing I normally use for mounting FBL controllers. I decided to use the clear version of the tape on this install as it should be better at dampening any vibration. I mounted the main unit on the boom block, being careful to mount it straight. The Rx is mounted under the boomblock, which works well with the short connecting wires supplied and the LED unit I mounted on the lower section of the main frame at the back as it is recommended that it should be visible when flying. The GPS unit needs to be mounted on the boom, at least 20cm away from the tail servo and comes with a mount that fits to the boomblock with 2 tie straps. The unit needs to be accurately orientated on the boom and comes with a few black stickers that can help with aligning it (see the photos). I used the supplied 3M tape to mount it. Here are a few photos of the install. 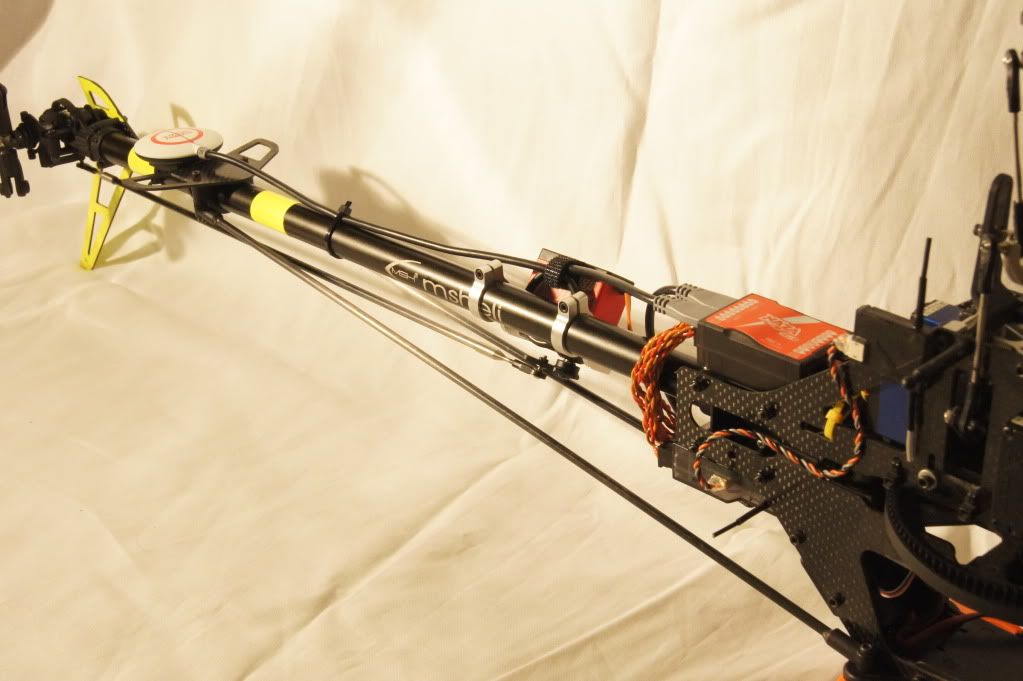 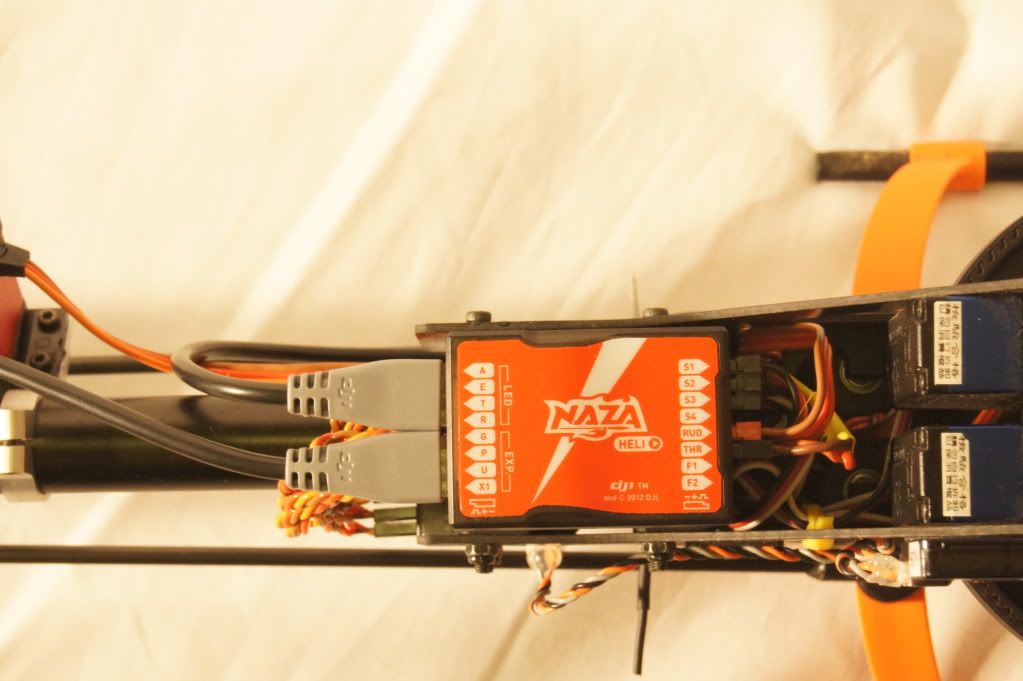 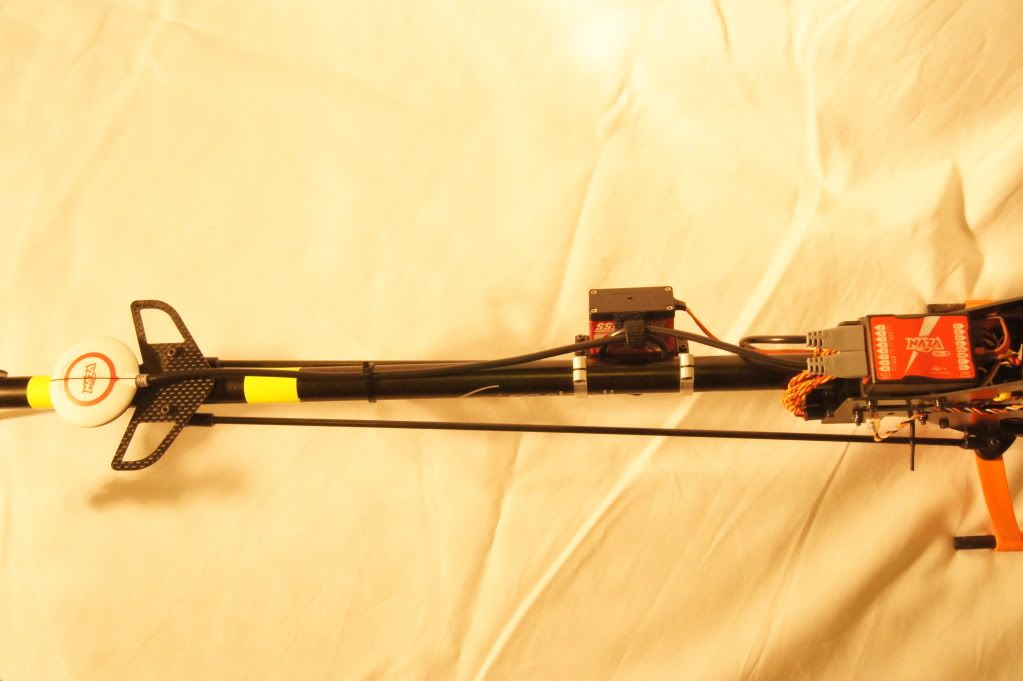 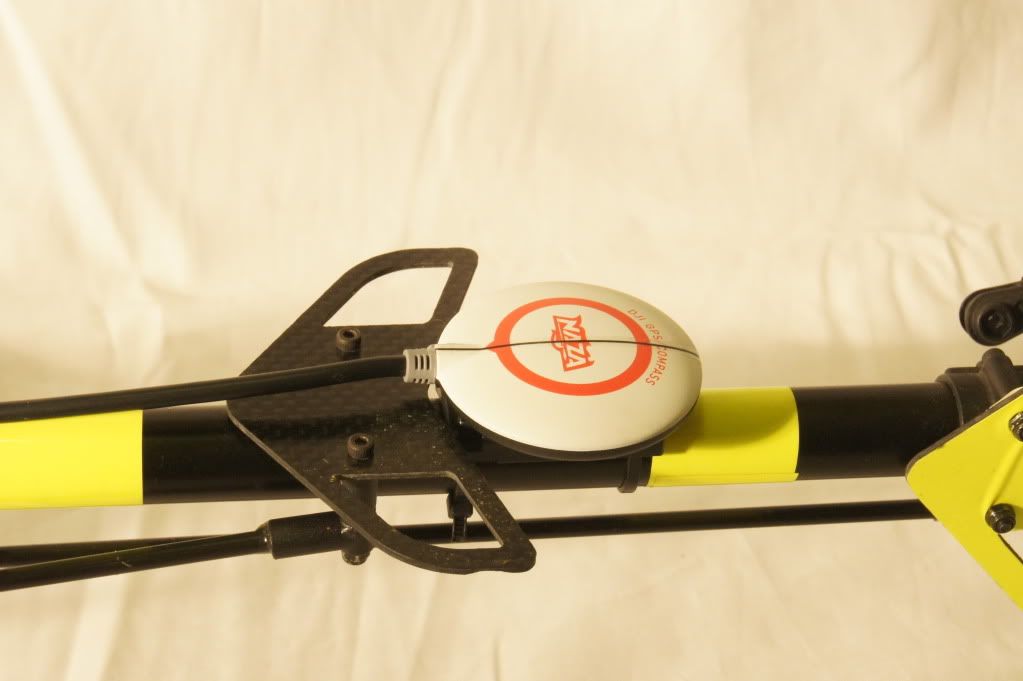 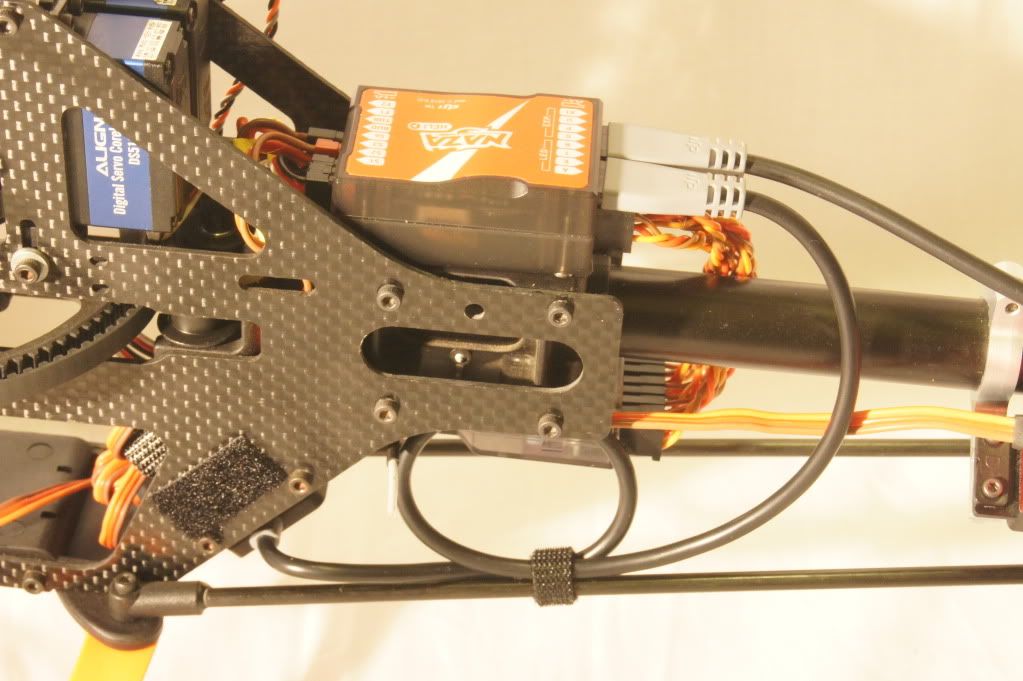 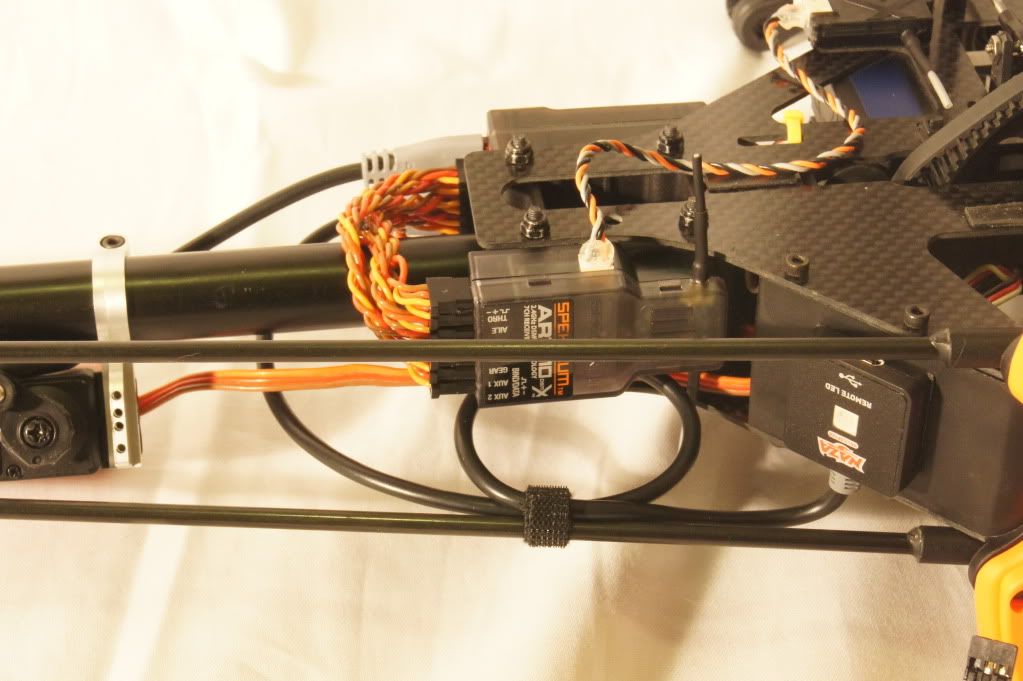 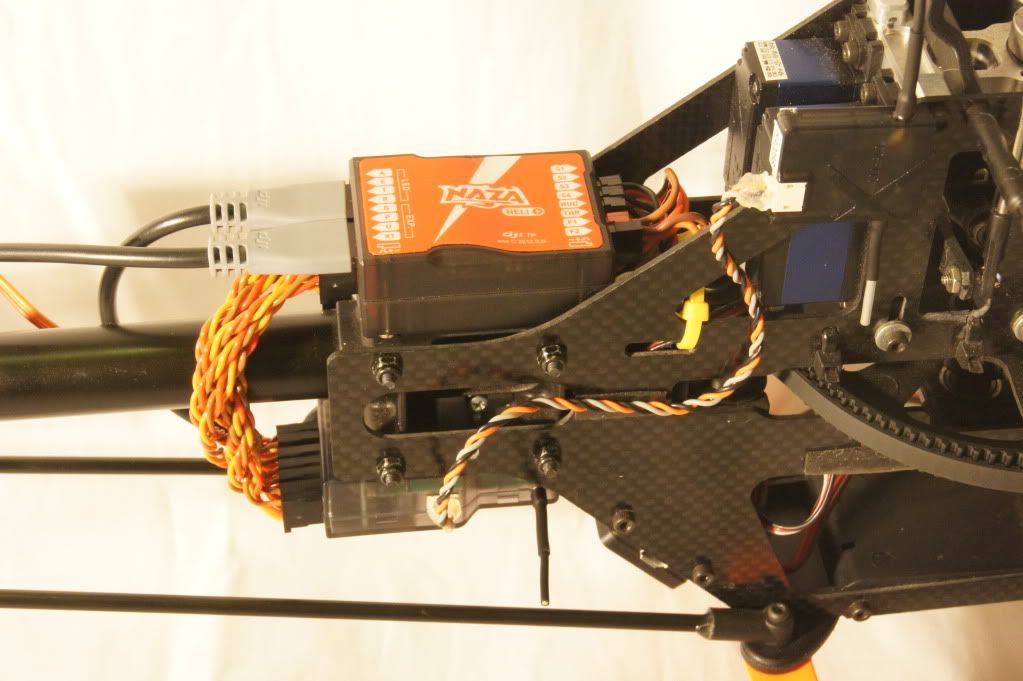 This heli has been a little nose heavy as I can't get the packs all of the way back under the canopy so I have had a 50c piece on the tail fin to get it balanced, with the GPS there and the other components all being behind the mainshaft, I may have the opposite problem now, but I think I can move the pack forward a little if needed. Next step was to start up the software and start the configuration wizard. The process is very similar to other FBL setups like the Brain and Vbar. After restoring factory default settings as recommended and selecting the Rx type you then setup the channel that controls the mode of the unit between manual, ATTI and ATTI with GPS. I will revisit this step later on as it is also at this point you are meant to setup the failsafe, but I will be coming back after completing the setup before I do that. Next is setting up the Tx throws and rather than tuning the endpoints and sub-trims, the software looks at the values from you Tx at the extremes, similar to the way Phoenix calibrates to your Tx. After this the units orientation and swash/servo layouts are selected and then you have a chance to select if the unit is to be used on a FBL or a FB heli. I had almost forgotten that the unit will also work on a Flybar heli, I won't be testing this functionality as I no longer have any FBL heli's. That is as far as I am taking it tonight as the next steps need the head removed to level the swash so it will have to wait till tomorrow. //Dennis.
__________________
soXos: Strike 8.1 - Strike 7.1 Light - Strike 6.1 : Goosky: RS7 - RS4 - S2 - S1 soXos DB7 nightflyer : Jeti DS-16 & DS-12 I am www.soxosaustralia.com.au | soXos helis | 1st-RC Products | EGODRIFT motors | Goosky helis | Spinblades Last edited by Thunder Fighter; 12-16-2012 at 03:02 AM.. |
|
|
|
|
|
12-12-2012, 07:57 AM
|
#3 (permalink) | |
|
Registered Users
Thread Starter
Join Date: Jul 2007
Location: Melb, Oz
|
Before going any further with the setup I decided to change to the NAZA BEC that was part of the package I received from Quinton, up to this point I was using an external pack to power the unit. The BEC is well suited to this size heli and as I have LV servos I left it set on the 5.8V setting. It looks like a nice unit, well built (externally) and with a good heatsink.
Jumping back into the setup, here are some notes on the tabs in the setup mode. Most of it is self explanatory so I am only commenting where necessary and if I didn't follow the instructions or at least the order of them. Trim: For this section, set the arms as close to 90 degrees as possible then use the trim settings for each servo to get them to 90 degrees or at least close. There are both sliders and boxes where you can enter a value for most of these settings and I found that the sliders were next to useless and ended up putting numbers directly into the software and hitting return to enter the value. Making sure my links to the swash are all exactly the same length to the swash I then levelled the swash, using a swash leveller after removing the head, with small changes to the servo trims, again keeping an eye that the arms were as close to possible to 90 degrees. In the next step the notes from DJI want you to trim your zero pitch using the other slider but it is better to use your pitch links to do this, so replace the head and adjusted the links till I had zero pitch on each blade. A easy way of doing this is to use one of your tools that is a good fit in the blade bolt holes, drop it though and line this up with the main shaft. Mix: I modified the order in this section a little, I set the collective pitch to +-12 degrees first, then worked with the swash ring limit to remove binding in the system. Doing it the other way around as suggested means you can reduce your collective travel at the extremes more than required, but you must remember to check for binding if you change your pitch. 43% on the Collective gave me +-12 Degrees and even with the swash ring reduced to 65% to remove binding, I was still achieving +-10 degrees of cyclic at full pitch, so this will not limit the 3d ability of the heli. Cyclic: I ended up using 6.8 degrees for my Stretched 500 based on the suggested cyclic set point for a 450 and 600. This was 55% in the box. Feedback: This page can be a little confusing so I have borrowed from a post here by "Tahoe Ed". Quote:
If you are setting up for 3d and have a standard +-12 degrees of pitch then take note that the Autopilot vertical gain should be reduced to 60%. I also increased the cyclic rate for the controller from the default 180 degrees/sec to 240 degrees/sec which is what I was using on the Skookum I took out of this heli. The rest of the settings were left at default but I did notice that the Auto trim was showing +1000 for both elevator and aileron so make sure you check this and reset them before flight if they are not on Zero to start with. So now with the main setup complete there were still a few outstanding steps to finish off before the maiden flight. I setup the Transmitter with 30% expo on each of the cyclic channels and started with 40% on the rudder and went though the Castle Creation 100A ICE Lite setup in fixed endpoint mode to set the ATV's then enabled the set rpm governor mode and bail out. Headspeeds were 2100/2400/2600rpm on the 475mm blades. Now I mentioned early on that I skipped a step which was setting the failsafe of the Rx so that it enables the failsafe of the NAZA. I did this on purpose as it is always good practice to re-bind after getting everything setup including the ESC. So now I modified the mode selection channel to give failsafe on the mode tab of the setup software, and with the throttle at zero, rebound the Rx to set the failsafe setting. I then went back and set the mode channel back so it will switch Manual/Atti/GPS. At this point it is worth checking again all of your stick inputs and the FBL corrections in all of the modes, just to be sure you have everything correctly configured, otherwise it will be a very short maiden flight. I did some quick tests at this point before I fitted the blades and tails. I found that if I switched off the Tx to enable failsafe while in manual mode, the motor shut down and the NAZA went into failsafe mode, which is good. The effect would be that as the headspeed bled off the heil would hold station and rapidly run out of headspeed and drop to the ground. If I did the same thing when in GPS mode, the motor did not shut down, but the failsafe on the NAZA kicked in, so in this case the heli would hover in a stationary position till the battery ran down then probably also drop to the ground as the NAZA tried to increase pitch but the headspeed decayed. It is possible it may land this way but it is hard to know if the packs would give out leaving no headspeed or even drop voltage so the BEC could not supply the NAZA. This also brings up a possible safety issue in that the when in GPS mode, the NAZA will keep whatever throttle was in place when it entered it, until you leave GPS mode, even ignoring Throttle hold. While it is unlikely to cause an issue in most scenarios I can think of, it is still different to normal heli behaviour where Throttle hold on an electric model means the motor cannot be running. Worth being aware of this. I did skip over one other part of the setup where you must tell the NAZA where the main unit and the GPS are mounted in relation to the centre of gravity of the heli in X, Y and Z dimensions. I left this till I fitted the main blades, tail blades, battery and canopy so I could check the Centre of gravity. Normally you want this to be on the mainshaft in the X dimension and after a slight repositioning of the pack I achieved this, so the X dimension for both the Main unit and the GPS can just be measured from the mainshaft to the centre of each of the units. Keep in mind that being behind the mainshaft the values are negative. For the Y axis (on the advanced screen) everything should be mounted on the centre line of the heli so this was left at 0. The Z axis requires you to see where the CofG for the heli is in the vertical dimension. With this heli I was able to balance it with my fingers on the mainframe to find it was just above the main gear, or almost in line with the top of the boom. So the GPS was pretty much on the balance point so I left it at 0 but the Main unit was about a centimetre above, and again this is a negative value for NAZA so -1 cm was used for the Z axis offset. So off to the field for the test flights. When I got to the field I did the Compass calibration test first, which involves switching the mode switch 6 to 10 times fast from manual to GPS and finishing in Manual mode where the indication light should be now yellow. A spin around the mainshaft and I got a green, then two turns vertically and it accepted the calibrations. First flight was just to test the FBL controller functionality. The heli lifted straight off and I did some gentle hovering and pirouettes to get a feel for the setup. I reduced the tail expo as it was not very responsive but then went on to fly some circuits in IU1. I found the tail gain was a bit high as I was getting a wag when I pushed the tail through the turn so reduced that from 40% down to 35%. Some pitch pumps showed a little kick to the right so it needs some more pre comp but in IU2 it was pretty good. I did some elevator and aileron flips and it felt ok but during a nose in funnel I again got some tail wag so dropped the tail gain down further. The second flight was to check the ATTI mode and GPS mode. I gained some hight and selected ATTI mode, there was some drift but it was a windy day. I was able to move the heli around ok but it was not very responsive. After again getting a bit of hight I selected GPS mode, this was great, the heli just sat there, no real movement in any direction. I brought the heli down closer and again went in to GPS mode, leaving the heli sit in a hover for about a minute and it didn't move. Very nice, I didn't really attempt to fly it around much but I was able to position it without any trouble. Look Ma, no hands.  The last couple of flights were testing the FBL out with some of my soft 3d flying; continuous flips, funnels, rainbows, travelling piro's and flips, etc. The overall feel of the cyclic is a bit disconnected, not really bad, but not polished like the top line units. The tail could do with some improvement though, it felt spongy and while it didn't blow out, even with fast backward flight and tail slides, it didn't feel consistent around centre. It didn't display any whipping in travelling piros though. I ended up with a fairly low gain as it got upset in a high speed pass in the third flight so it may need some more tuning. Not bad considering it is their first real 3d FBL unit and first release firmware, a good pilot would make it look good as some of the 3d videos that have been posted show. There is not too many settings to be able to tune the feel, like the style or agility on other controllers but I am happy enough with the unit to move it over to the Goblin and see how it works on a bigger heli and will get a more skilled 3d pilot to have a fly and give their impressions as well. //Dennis.
__________________
soXos: Strike 8.1 - Strike 7.1 Light - Strike 6.1 : Goosky: RS7 - RS4 - S2 - S1 soXos DB7 nightflyer : Jeti DS-16 & DS-12 I am www.soxosaustralia.com.au | soXos helis | 1st-RC Products | EGODRIFT motors | Goosky helis | Spinblades Last edited by Thunder Fighter; 12-18-2012 at 08:12 AM.. |
|
|
|
|
|
12-18-2012, 08:09 AM
|
#5 (permalink) | |
|
Registered Users
Thread Starter
Join Date: Jul 2007
Location: Melb, Oz
|
Quote:
Post #2 and #3 updated with setup and flight report. //Dennis.
__________________
soXos: Strike 8.1 - Strike 7.1 Light - Strike 6.1 : Goosky: RS7 - RS4 - S2 - S1 soXos DB7 nightflyer : Jeti DS-16 & DS-12 I am www.soxosaustralia.com.au | soXos helis | 1st-RC Products | EGODRIFT motors | Goosky helis | Spinblades |
|
|
|
|

|
12-18-2012, 08:53 AM
|
#6 (permalink) |
|
Join Date: Mar 2007
|
=] nice write up there Dennis,
 will let you do the SK one I think! will let you do the SK one I think! 
__________________
 |
|
|
|
|
12-18-2012, 09:01 AM
|
#7 (permalink) |
|
Registered Users
|
Dennis,
Way to go. I would say Mate, but I am not from Oz and it would sound disingenuous.so I won't. I have worked with quite a few Aussies in the Ski Industry, they were a great group. It would help folks to have you share your Normal, ST1 and ST2 throttle and pitch curves. I don't think that the Hard Core 3D guys will be interested in the Naza H. Your mild 3D is probably the most that this controller will see. Thanks for sharing.
__________________
AMA #844172 DJI S1000 Lightbridge Zen for 5D, S900 LB Zen for BMPCC, DJI Phantom 2 Vision +, P2Z2 with Data Link, P2Z3 with LB DJI Forum Support Last edited by Tahoe Ed; 12-18-2012 at 11:04 PM.. |
|
|
|
|
12-18-2012, 07:00 PM
|
#8 (permalink) | ||
|
Registered Users
Thread Starter
Join Date: Jul 2007
Location: Melb, Oz
|
Quote:
Quote:
Thanks for the prompt on setup: I run all of my pitch curves, as 45 degree straight lines giving +-12 degrees in all Normal, IU1, IU2 and Hold. For Throttle curves I use a governor so I have flat straight lines, with the Castle Creation governor Normal is set to 30%, IU1 to 70% and IU2 at 100%, but the actual headspeeds are set in the controller firmware at 2100/2400/2600rpm. I tried the GPS in normal and IU1 with similar results. I didn't mention I did one Auto on the last flight from 30 meters up and the controller had no problem with the headspeed as it decayed before landing. I'm not exactly sure where NAZA is positioning this unit as the mix of features is a bit confusing. It looks like a very good Scale and AP but without being able to act as a bailout, they don't seem to be much advantage for 3d flight. I guess it gives them a 3d capable controller to work on and improve over time. //Dennis.
__________________
soXos: Strike 8.1 - Strike 7.1 Light - Strike 6.1 : Goosky: RS7 - RS4 - S2 - S1 soXos DB7 nightflyer : Jeti DS-16 & DS-12 I am www.soxosaustralia.com.au | soXos helis | 1st-RC Products | EGODRIFT motors | Goosky helis | Spinblades |
||
|
|
|
|
12-18-2012, 11:16 PM
|
#9 (permalink) |
|
Registered Users
|
I am with you on the positioning of this unit. The WKH will handle the scale crowd and maybe in the future be able to support the ZenMuse GoPro camera mount as well as 1-5 way points. I doubt that the Naza H will ever be able to control a camera or connect to the Ground Station. The issue is that the Ace One is such a high profit item for DJI, my feeling is that they do not want to take away from that high end market. Both the WKH and Naza H are considered Hobby controllers while the WKM, for multi rotors, and Ace One, for single rotors, are the Pro Controllers. I don't know and DJI is not talking. So take your best guess, you have a 50/50 chance of being right.
__________________
AMA #844172 DJI S1000 Lightbridge Zen for 5D, S900 LB Zen for BMPCC, DJI Phantom 2 Vision +, P2Z2 with Data Link, P2Z3 with LB DJI Forum Support |
|
|
|
|
12-21-2012, 12:45 AM
|
#10 (permalink) |
|
Registered Users
Thread Starter
Join Date: Jul 2007
Location: Melb, Oz
|
Put another few packs through today and did some flying in ATTI and GPS enabled. I can see why the scale pilots like the NAZA setups, they make flying very smooth, even in the strong wind in Melbourne today. Biggest issue was getting used to the lack of responce, particularly the tail and aileron in these modes. It does fly like a co-axial, so even though easy to fly, you wouldn't learn much flying this way as a beginner.
Even though the system is not meant to be used as a bailout I did try enabling it when moving forward, but with my sticks centered as recommended when I flicked the switch. The heli pretty violently pitched up and came to a stop, then moved back to where I enabled the GPS. It was violent enough that I wouldn't recommend doing this when travelling at any speed, which is what the manufacturer recommends anyway. I will put another couple of packs through tomorrow at the field then move it to the Goblin over Christmas. //Dennis.
__________________
soXos: Strike 8.1 - Strike 7.1 Light - Strike 6.1 : Goosky: RS7 - RS4 - S2 - S1 soXos DB7 nightflyer : Jeti DS-16 & DS-12 I am www.soxosaustralia.com.au | soXos helis | 1st-RC Products | EGODRIFT motors | Goosky helis | Spinblades |
|
|
|
|
12-21-2012, 01:26 PM
|
#11 (permalink) |
|
Join Date: Mar 2007
|
=] will keep following your progress here Dennis, surprisingly quiet thread? the SK site would be blowing the server fuses?
how would you describe the positioning accuracy? the specs are like 2M horizontal, 0.8M vertical. can you see the gps data? either online or off? thanks, Georgi.
__________________
|
|
|
|
|
12-21-2012, 05:23 PM
|
#12 (permalink) | |
|
Registered Users
Thread Starter
Join Date: Jul 2007
Location: Melb, Oz
|
Quote:
The horizontal positioning seems very good, flying in strong wind it some times fools you as you flick the switch with the sticks centred and you see the heli move around slowly. I worked out that it was just moving itself back to the position where you enabled the GPS as when it gets there, it is very solid. Vertically is not quite as accurate, it can dip down a meter or two, again in wind, and need some correction on the collective stick. Enabled at head hight it did sink slowly down and I had to correct after 20-30 seconds. It's not bad but the horizontal seems to be better. //Dennis.
__________________
soXos: Strike 8.1 - Strike 7.1 Light - Strike 6.1 : Goosky: RS7 - RS4 - S2 - S1 soXos DB7 nightflyer : Jeti DS-16 & DS-12 I am www.soxosaustralia.com.au | soXos helis | 1st-RC Products | EGODRIFT motors | Goosky helis | Spinblades |
|
|
|
|
|
12-21-2012, 09:02 PM
|
#13 (permalink) |
|
Registered Users
|
Dennis have you tried to increase the head speed? That will increase the responsiveness in the vert.
__________________
AMA #844172 DJI S1000 Lightbridge Zen for 5D, S900 LB Zen for BMPCC, DJI Phantom 2 Vision +, P2Z2 with Data Link, P2Z3 with LB DJI Forum Support |
|
|
|
|
12-22-2012, 03:01 AM
|
#14 (permalink) |
|
Registered Users
|
I really hope this does not turn out like the Wookong-M story
https://www.helifreak.com/showthread.php?t=481663
__________________
CopterX 450 Black Angel FBL "Night Rig" | ZYX v4.0 PRÔTOS 500 FBL "Sky Whip" | Robird G31 Audacity P6 FBL "Phoenix" | MSH Brain | 12s Goblin Speed | iKon |
|
|
|
|
12-22-2012, 08:43 AM
|
#15 (permalink) | ||
|
Registered Users
Thread Starter
Join Date: Jul 2007
Location: Melb, Oz
|
Quote:
Quote:
Flew a few more packs today, still not happy with the FBL controller part even though it works well in GPS mode, both hovering and flying around in a scale manner. I can't get rid of the pitchiness at speed and the tail will not behave, I can get the tail to high speed wag when under stress either with FFF or in a funnel, drop the gain and then it is mushy and blows out, had no issues with a Sk720 or BeastX on the same heli in the past. I upped the gain in ATTI mode to 110% and 70% on the vertical and found some bobble on the aileron and also vertically so backed them down to 100% and 60% respectively. Also increased the FBL gain to see if it would reduce the pitching in FFF but didn't see any impact with a 20% increase. I will give it a try on the Goblin now and see if it behaves any better on a bigger heli. //Dennis.
__________________
soXos: Strike 8.1 - Strike 7.1 Light - Strike 6.1 : Goosky: RS7 - RS4 - S2 - S1 soXos DB7 nightflyer : Jeti DS-16 & DS-12 I am www.soxosaustralia.com.au | soXos helis | 1st-RC Products | EGODRIFT motors | Goosky helis | Spinblades Last edited by Thunder Fighter; 12-22-2012 at 04:59 PM.. |
||
|
|
|
|
12-22-2012, 02:38 PM
|
#16 (permalink) |
|
Join Date: Mar 2007
|
=] ok thanks Dennis, does the collective above 50% help the levitation? or is it "out of your hands"
__________________
|
|
|
|
|
12-22-2012, 05:07 PM
|
#17 (permalink) | |
|
Registered Users
Thread Starter
Join Date: Jul 2007
Location: Melb, Oz
|
Quote:
I edited the post above btw, as I made a mistake saying I had elevator bobble in GPS mode after adjusting the Gain, I meant to say vertically, so my gain at 60% is about right as 70% was a bit high. //Dennis.
__________________
soXos: Strike 8.1 - Strike 7.1 Light - Strike 6.1 : Goosky: RS7 - RS4 - S2 - S1 soXos DB7 nightflyer : Jeti DS-16 & DS-12 I am www.soxosaustralia.com.au | soXos helis | 1st-RC Products | EGODRIFT motors | Goosky helis | Spinblades |
|
|
|
|
|
12-23-2012, 07:04 PM
|
#18 (permalink) |
|
Registered Users
Join Date: Dec 2012
|
Hello, I'm new on the forum...this is my second post!
I recently bought a Naza-H for my Trex600 with 3GX, but the work to make it working fine is getting harder! I can see you have my same AR7000 and I use a DX7s with other models and Naza-M: I completed the setup and it's perfect in Manual Mode, but in Atti-GPS the swashplate is not level but shifted to the right (also if the flybarless system works good!)...I'm sure that with naza assisant my works was good, but I'm not sure about the radio, because I just found istructions for Futaba and it's (for me!) too much different...also the Filesafe for radio shut-off doesn't work with Naza-H, but with Naza-M is perfect! What do you think about it?...your description of flight looks good, so how can I fix it?...when you fly in Manual and then switch to Atti/Gps can you give more/less power to the engine?...this is also strange for us, here it's too new and we don't have so much informations as you! Thanks! |
|
|
|
|
12-24-2012, 07:28 AM
|
#19 (permalink) |
|
Registered Users
Thread Starter
Join Date: Jul 2007
Location: Melb, Oz
|
Hi Eddy,
Don't worry about the swash moving in GPS and ATTI mode, just make sure the corrections it is making as you tilt the heli are correct. For the failsafe make sure you set your Aux channel to show failsafe in setup page then rebind your Rx. Afterward you set your Aux channel back to the correct place. When flying in Manual mode then switching to ATTI or GPS mode, the throttle is kept the same as when you switched. The NAZA then uses pitch to raise or lower the heli based on your stick input. This is why I like to run a Governor in the ESC as it will try and keep the headspeed constant. If you are not running a governor then I would try and have a flat line throttle in the area above 0 pitch so the throttle will always be the same every time you enable GPS or ATTI mode. //Dennis.
__________________
soXos: Strike 8.1 - Strike 7.1 Light - Strike 6.1 : Goosky: RS7 - RS4 - S2 - S1 soXos DB7 nightflyer : Jeti DS-16 & DS-12 I am www.soxosaustralia.com.au | soXos helis | 1st-RC Products | EGODRIFT motors | Goosky helis | Spinblades |
|
|
|
|
12-25-2012, 05:06 AM
|
#20 (permalink) |
|
Registered Users
Join Date: Dec 2012
|
Thank you so much Dennis, you're so nice to help me!
So I really hope my settings are correct and I won't have flight problem....I think I'll try one of the next days! I just wanna be more sure about the the swashplate movement in Atti/Gps, so I made this video so I can show you how it works: I think in Manual it will wrok pretty good, but I just fear the second between I switch in Atti and the automatic flight correction...I fear it will transalte to the right too fast to keep in under control! I don't know, I show you, you already had experience, so you'll know for sure if my heli will survive or not  This message is an opportunity to wish you and to all the forum members a Merry Christmas Marco |
|
|
|
|
|
|
«
Previous Thread
|
Next Thread
»
| Thread Tools | |
| Display Modes | |


 Linear Mode

|
|


